Woocommerce Store Integration

Here is what you need to know to process your shop receipts, extract transactions, and integrate them back into your WordPress store powered by Woocommerce.

If the step-by-step tutorial fails to load or appears weird,  you may access it here

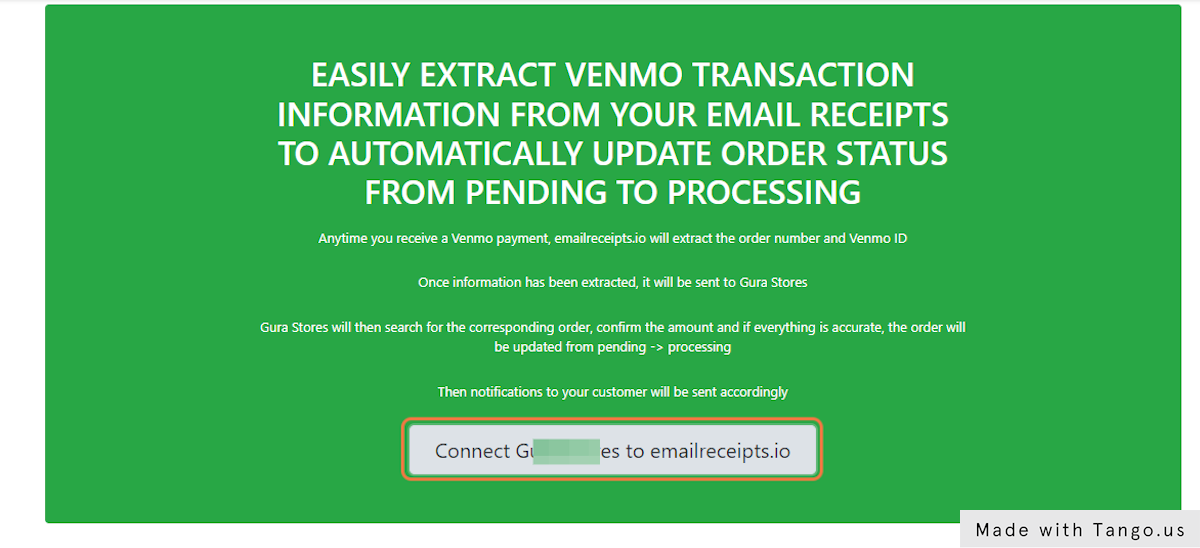
1. Go to Setup Automated Order Updates in your admin dashboard — Click on Connect Store to emailreceipts.io - WordPress

Go to Setup Automated Order Updates in your admin dashboard — Click on Connect Store to emailreceipts.io -  WordPress

2. Go to Store Connect | Email Receipts

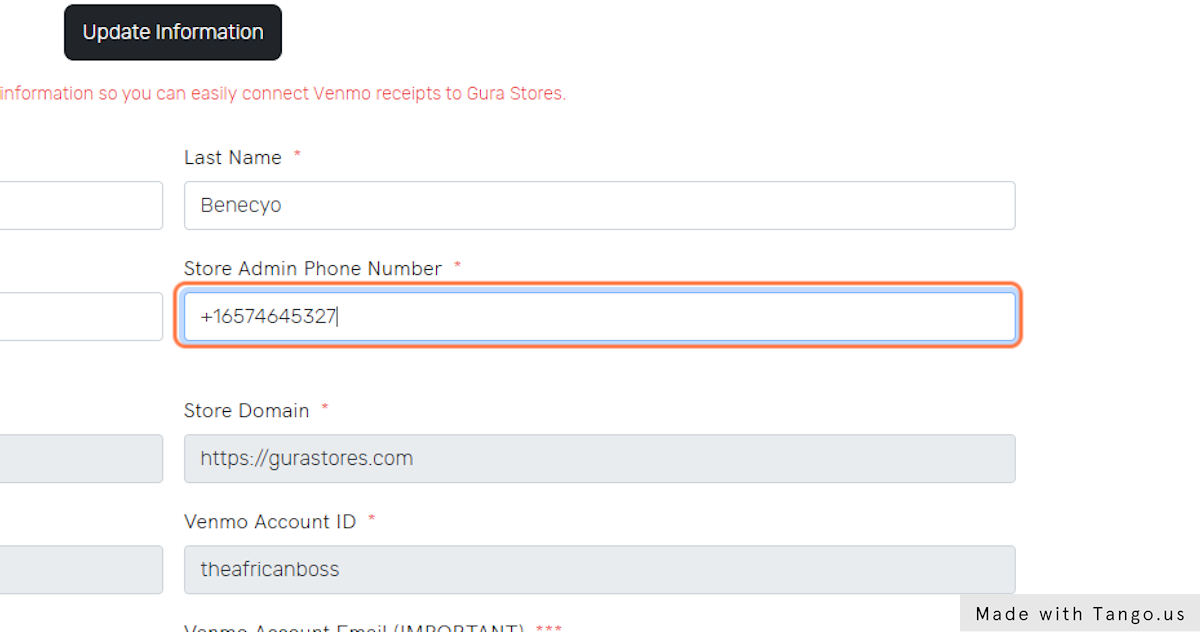
3. Update any information that might be missing

Update any information that might be missing

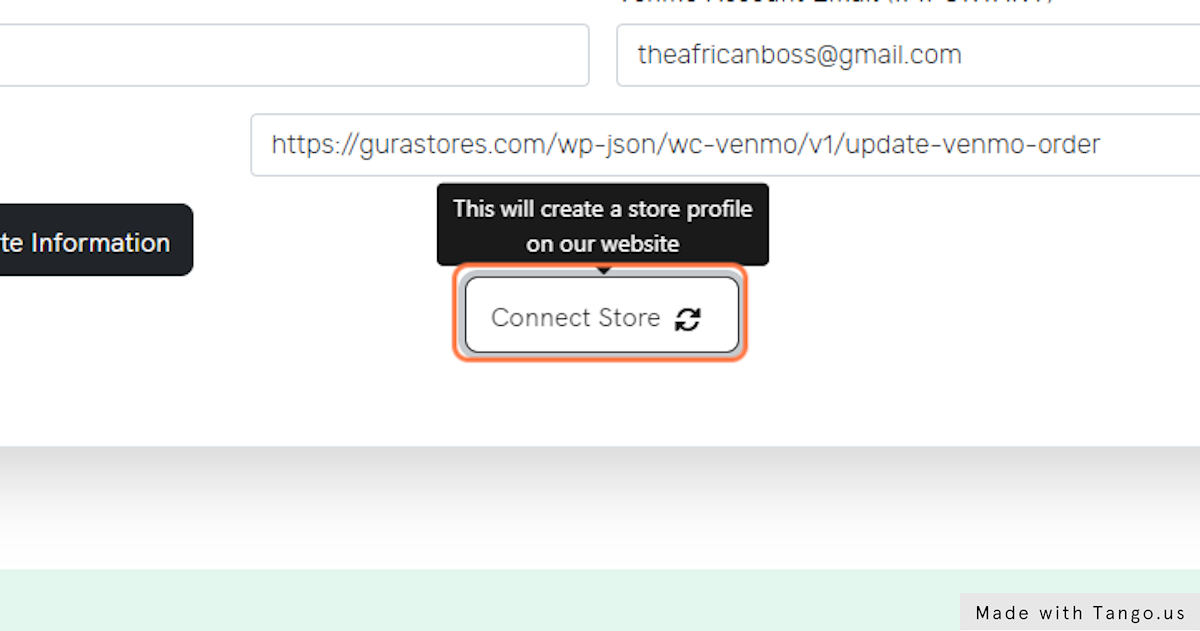
4. Click on Connect Store once all information has been entered correctly

Click on Connect Store once all information has been entered correctly

5. Read the instructions carefully telling you what email to forward for extraction

Read the instructions carefully telling you what email to forward for extraction

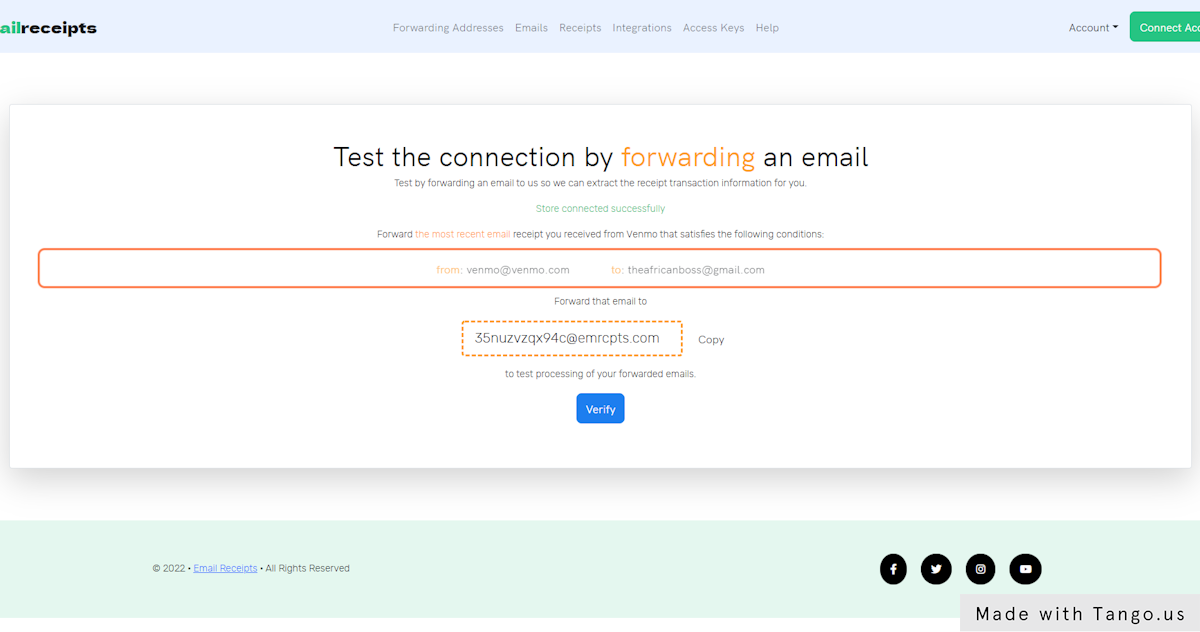
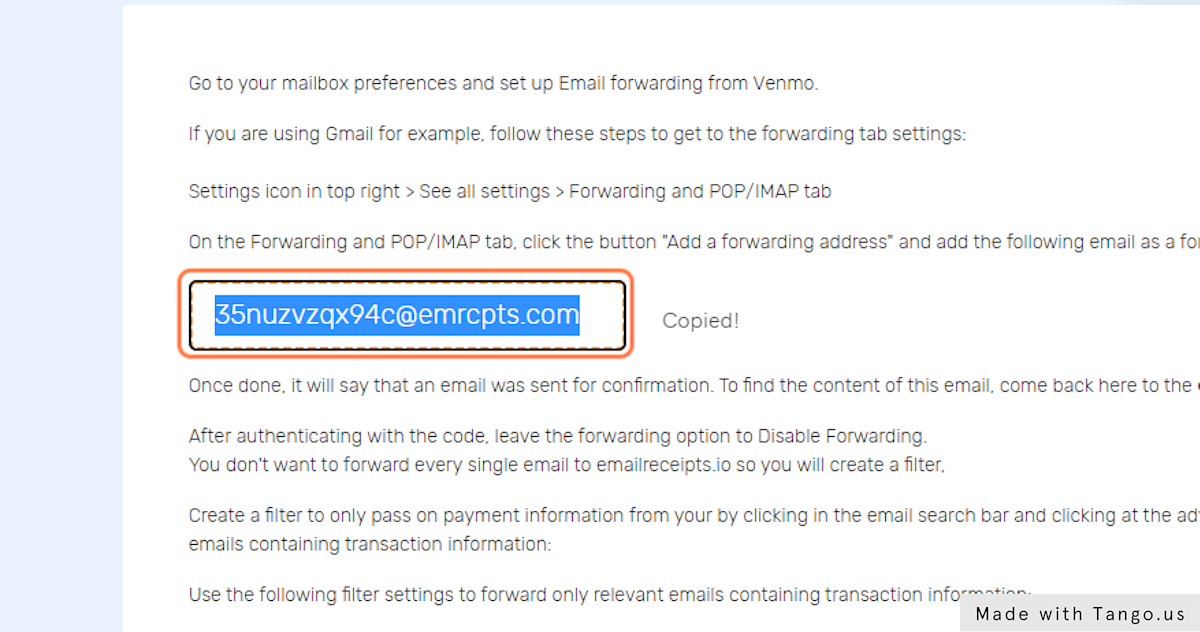
6. Copy your generated email address "*****@emrcpts.com" linked to your financial institution

Copy your generated email address "*****@emrcpts.com" linked to your financial institution

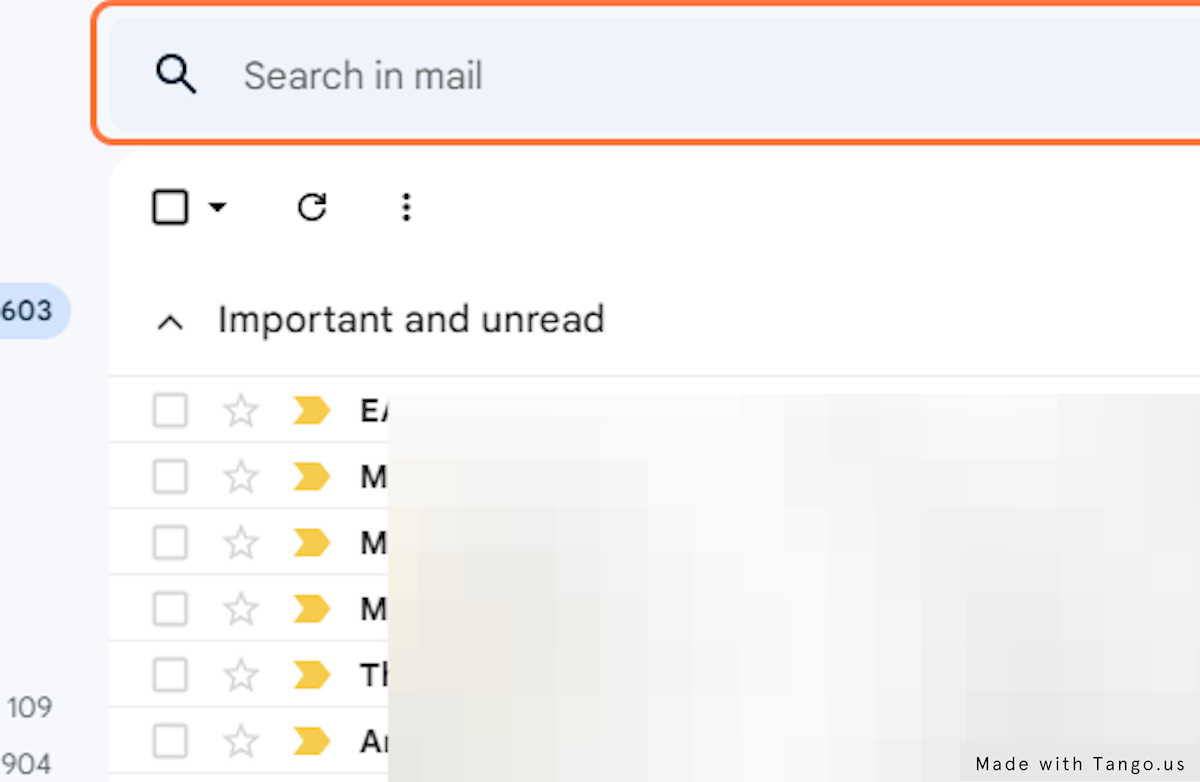
7. Go to the mailbox where you receive email receipts from your financial institution - example: Gmail

8. Click on Advanced search options

Click on Advanced search options

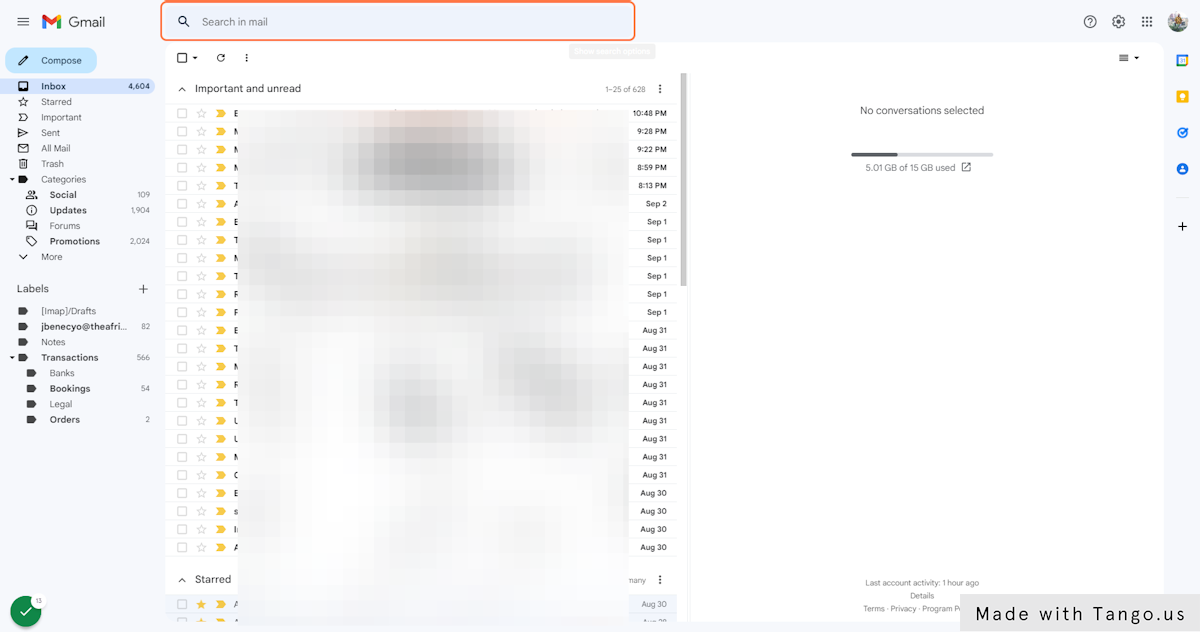
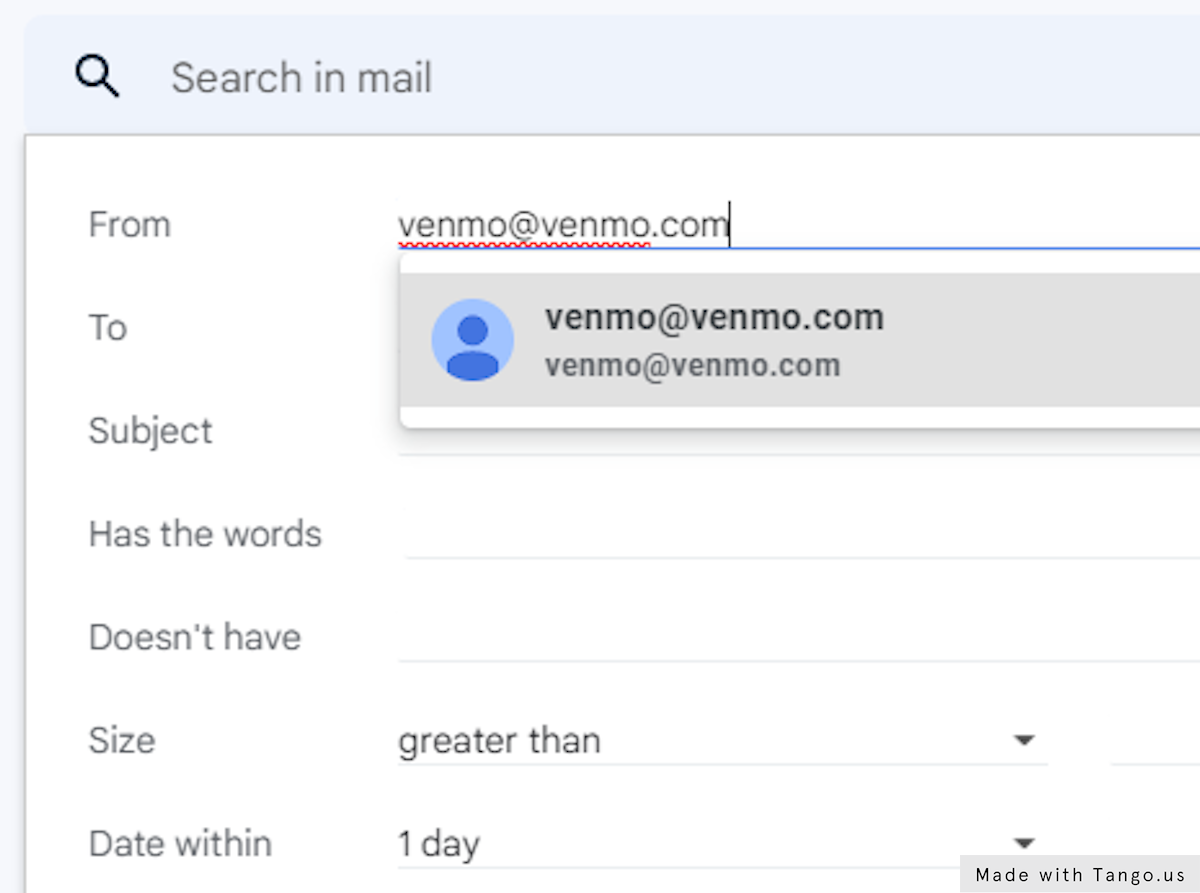
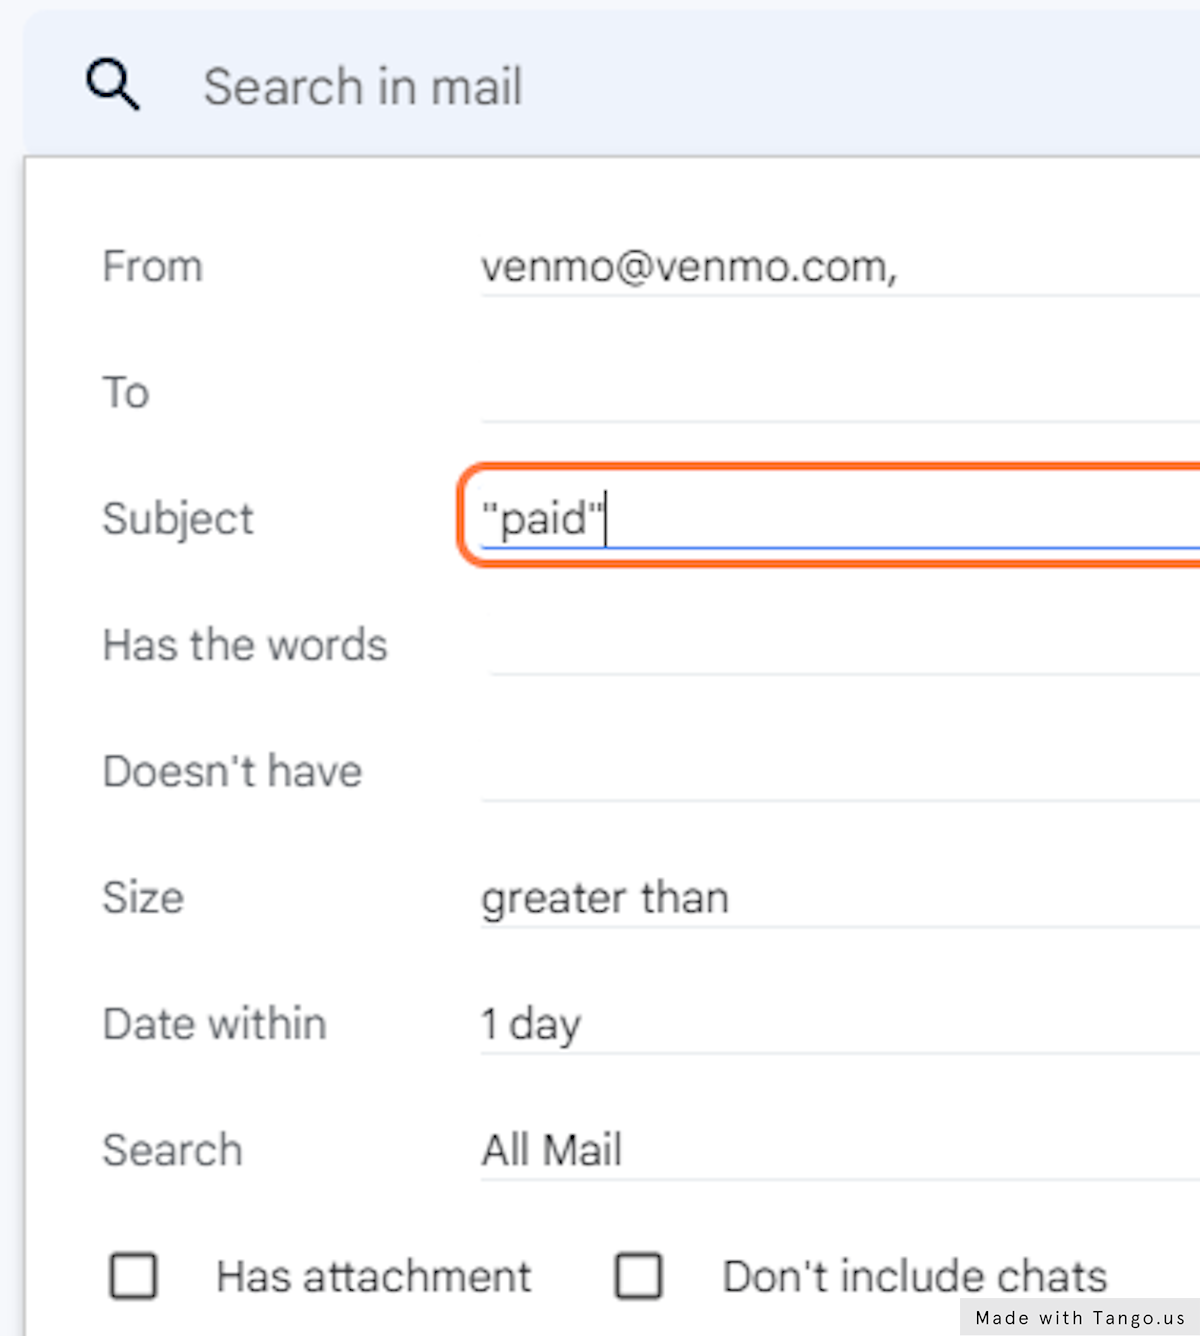
9. Type in the financial institution email address as provided in the emailreceipts.io forwarding email instructions

Type in the financial institution email address as provided in the emailreceipts.io forwarding email instructions

10. Check again the instructions if necessary

Check again the instructions if necessary

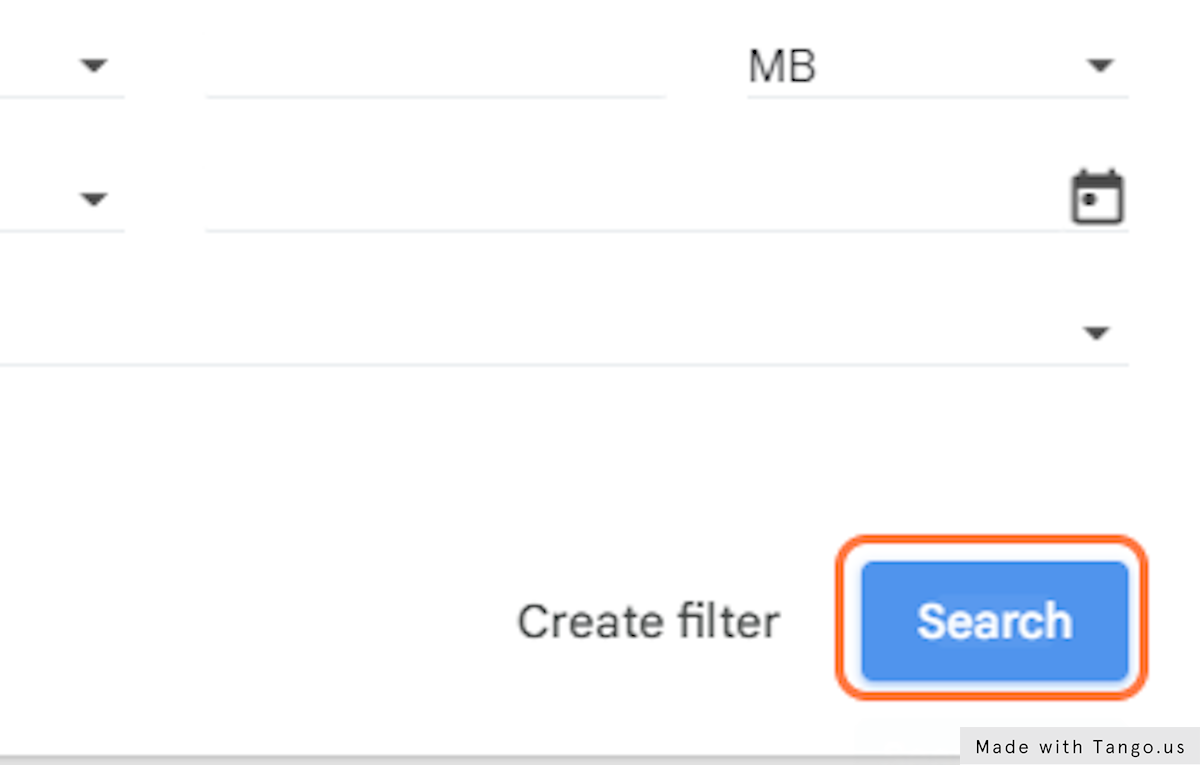
11. Depending on the case, you might add keywords in your advanced search to narrow down your search to only emails containing transactions for example emails containing the subject "paid you" (use the double quotes to emphasize those exact words in that order)

Depending on the case, you might add keywords in your advanced search to narrow down your search to only emails containing transactions for example emails containing the subject "paid you" (use the double quotes to emphasize those exact words in that order)

12. Once done with filtering, click on "Search"

Once done with filtering, click on "Search"

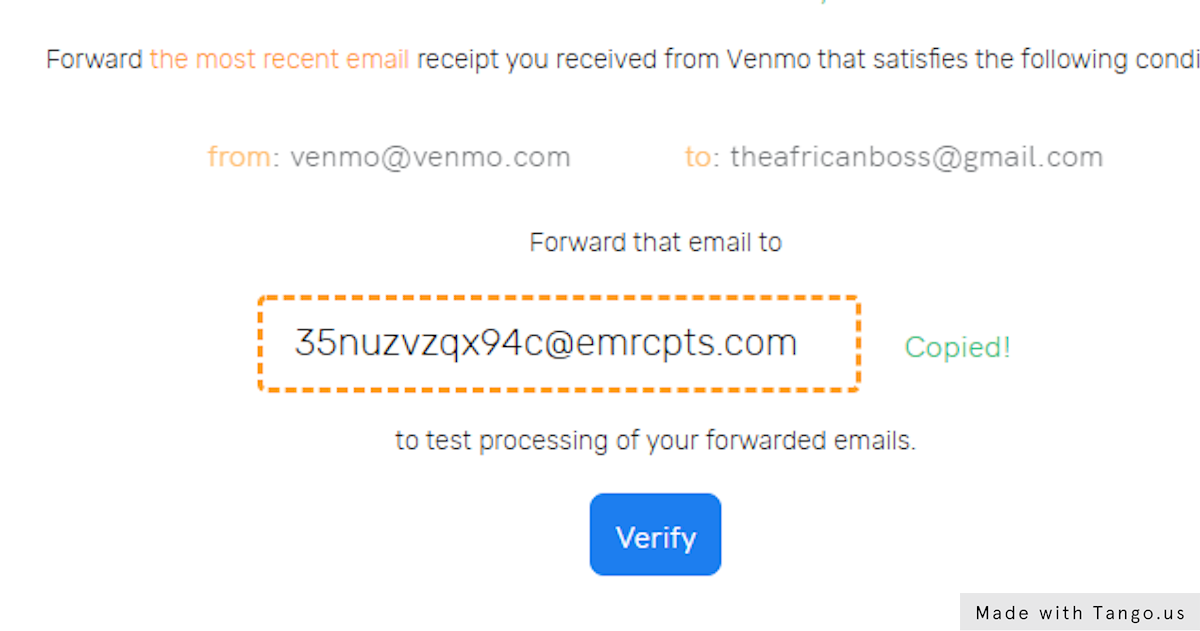
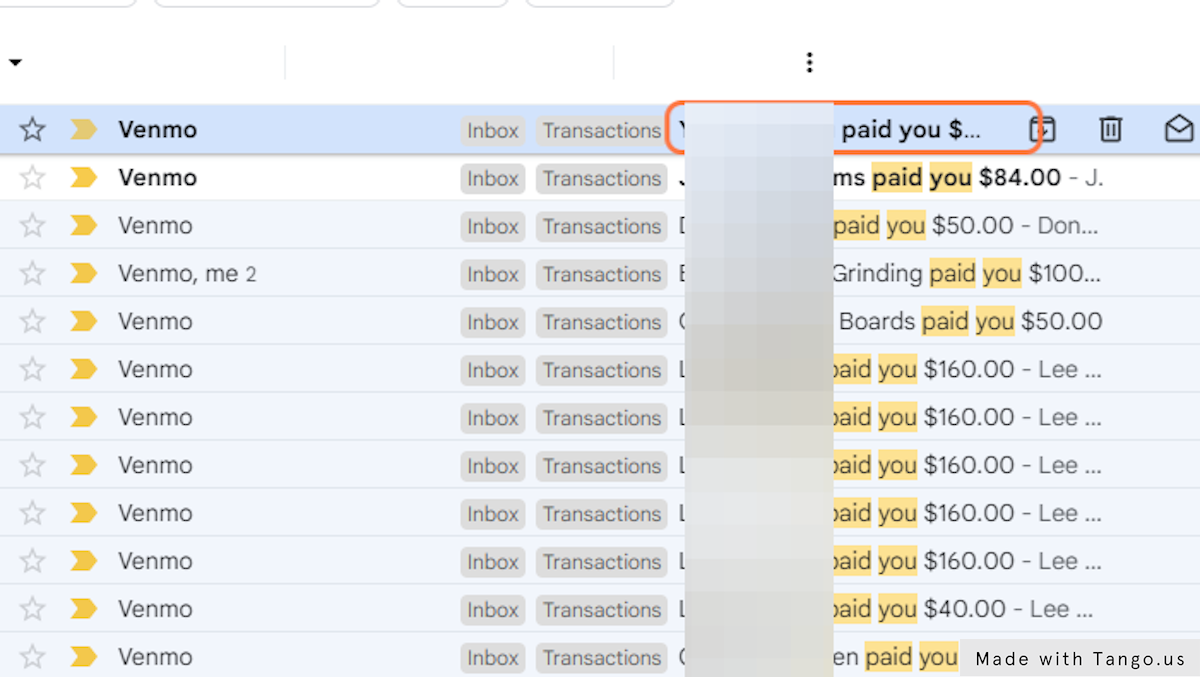
13. Click on the most recent email that corresponds to the emailreceipts.io instructions

Click on the most recent email that corresponds to the emailreceipts.io instructions

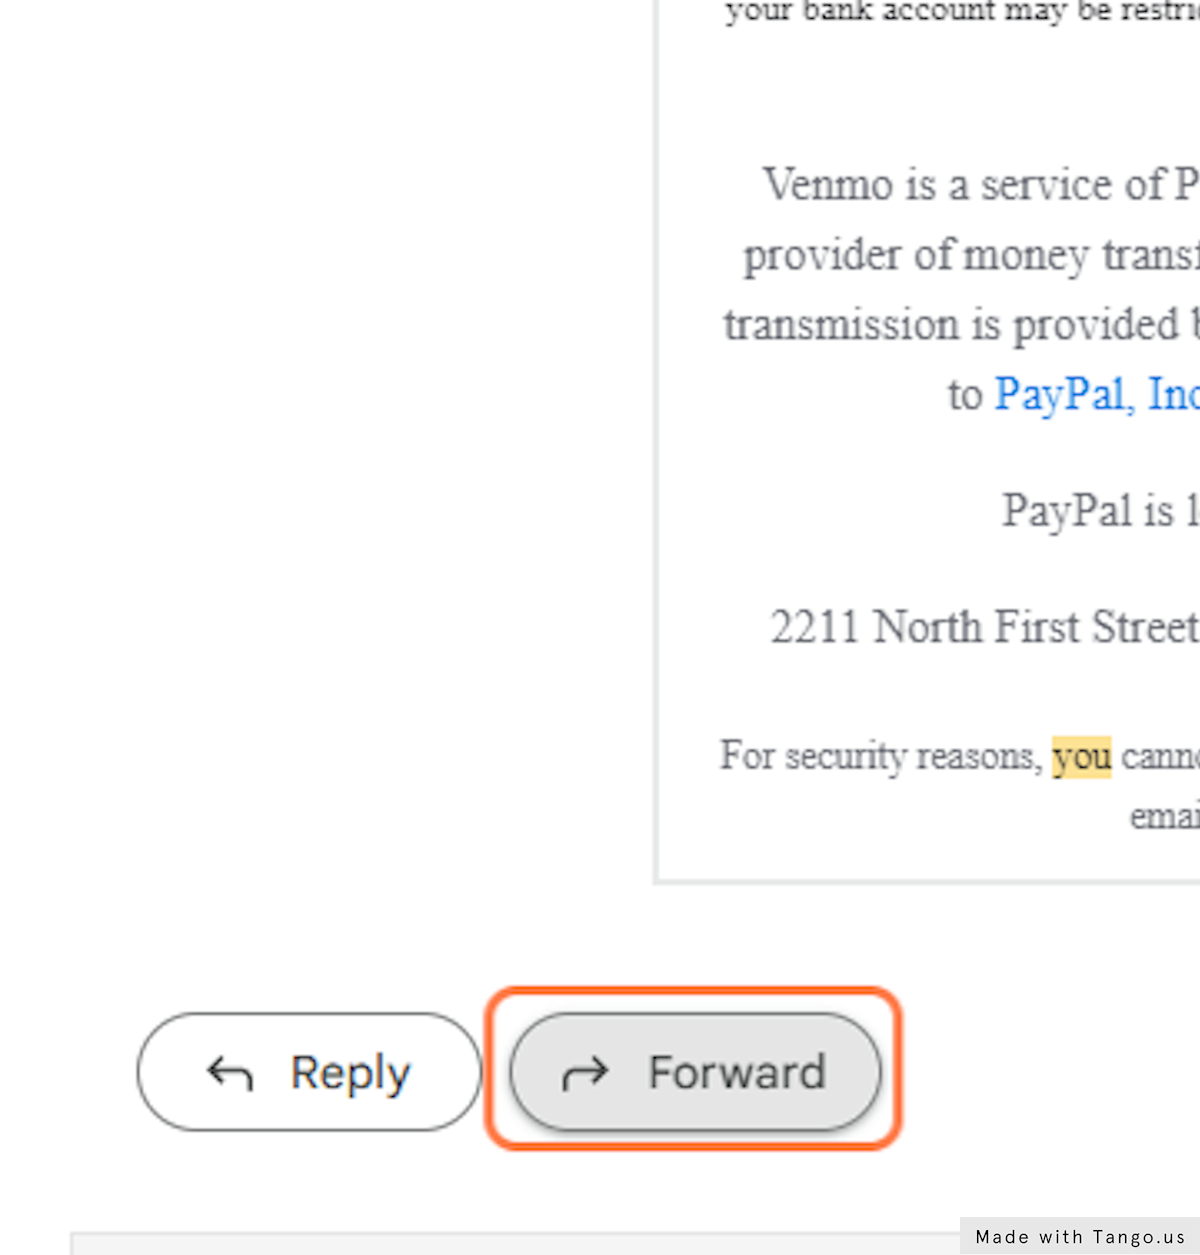
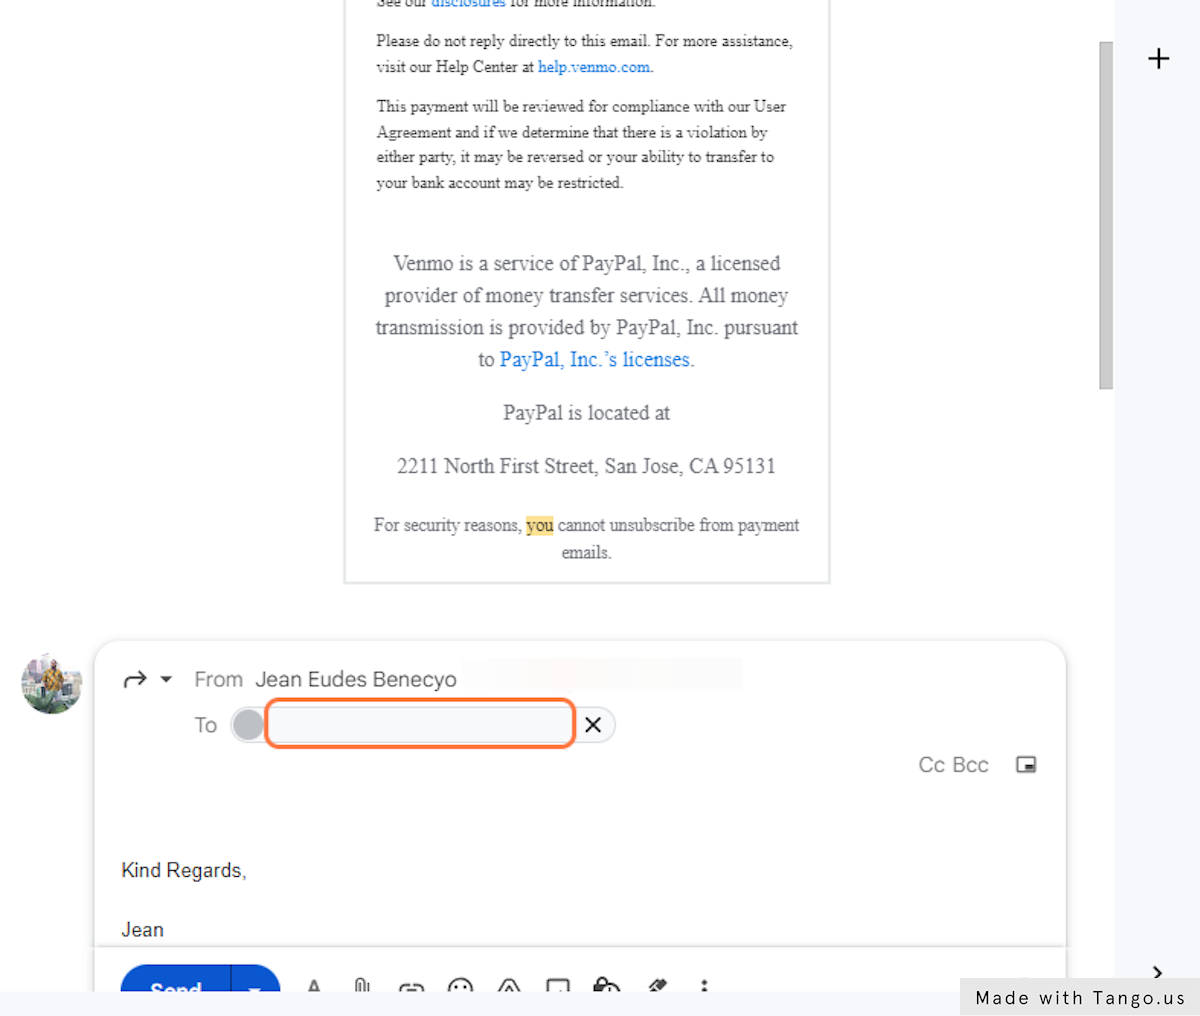
14. Click on Forward

Click on Forward

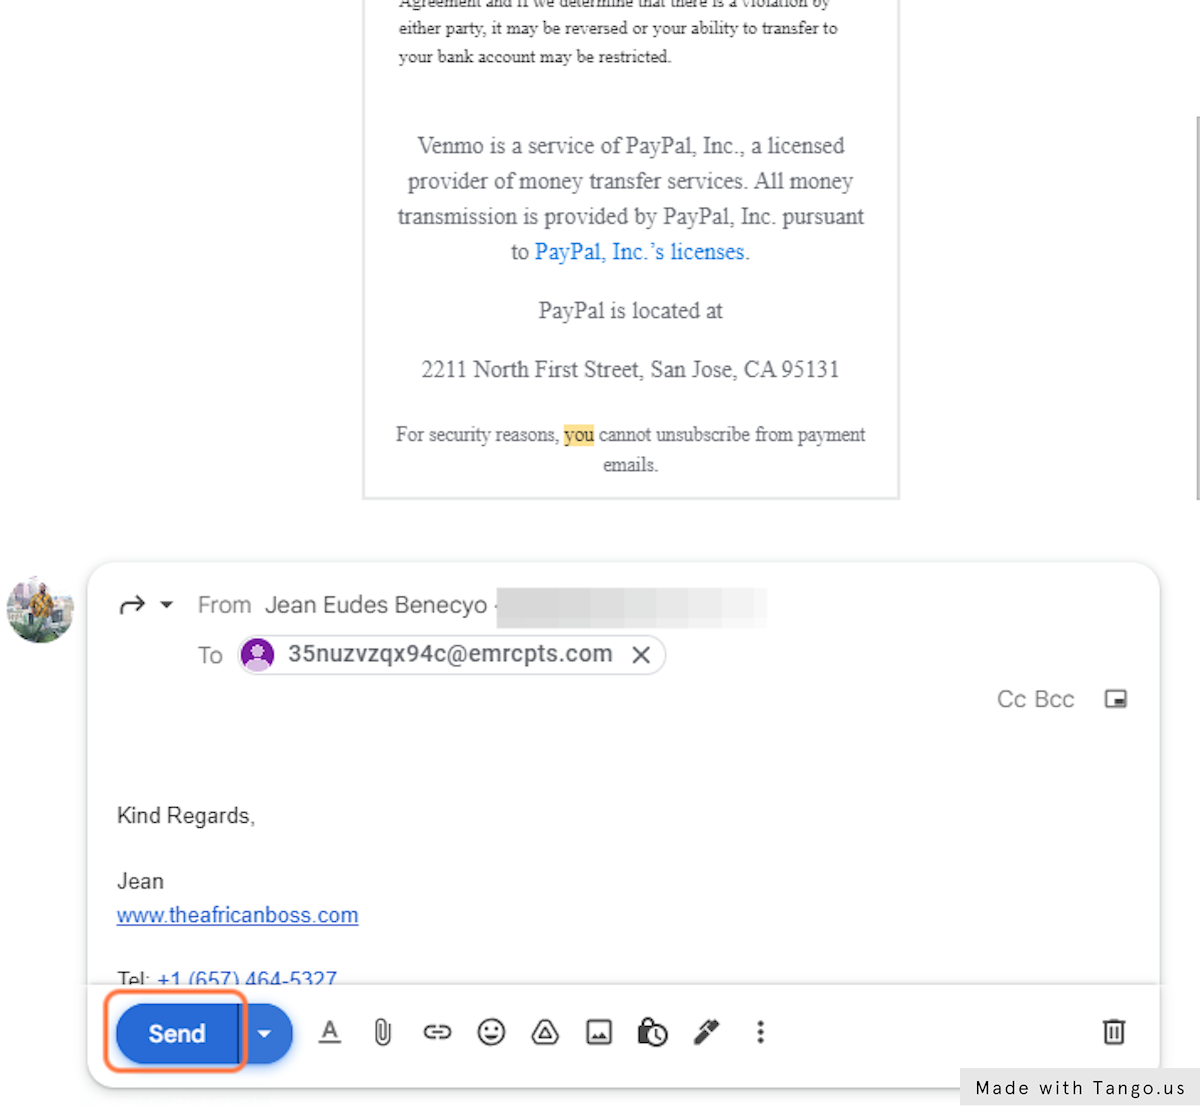
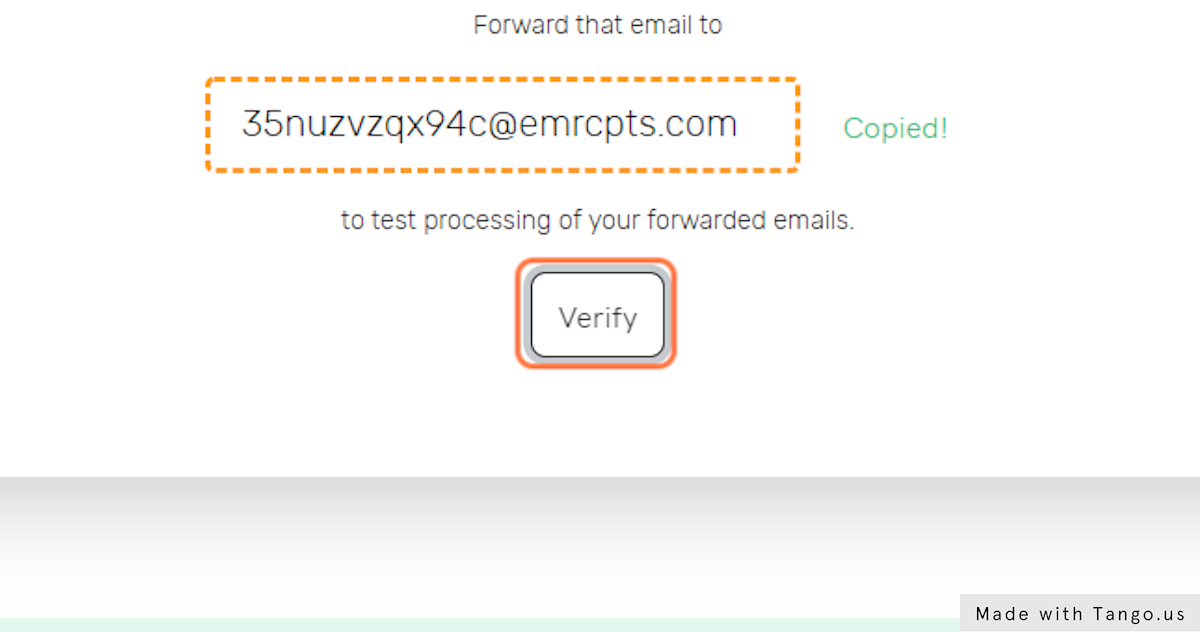
15. Copy your generated email address "*****@emrcpts.com" linked to your financial institution

Copy your generated email address "*****@emrcpts.com" linked to your financial institution

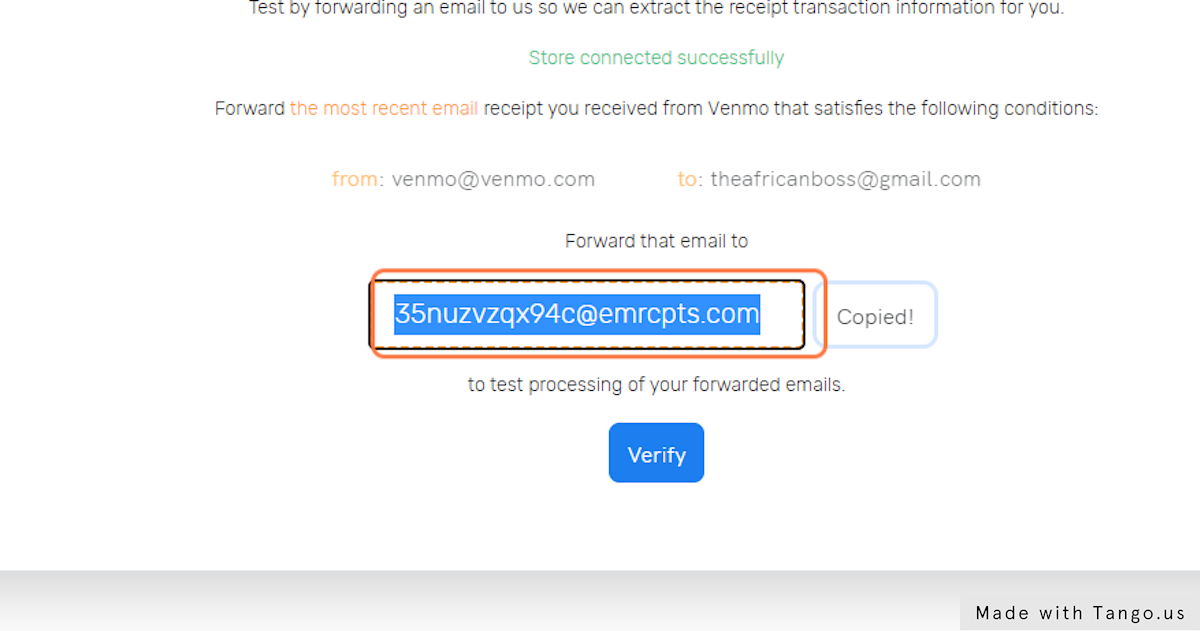
16. Forward the email receipt to "*****@emrcpts.com"

Forward the email receipt to "*****@emrcpts.com"

17. Click on Send to forward the email receipt to "*****@emrcpts.com"

Click on Send to forward the email receipt to "*****@emrcpts.com"

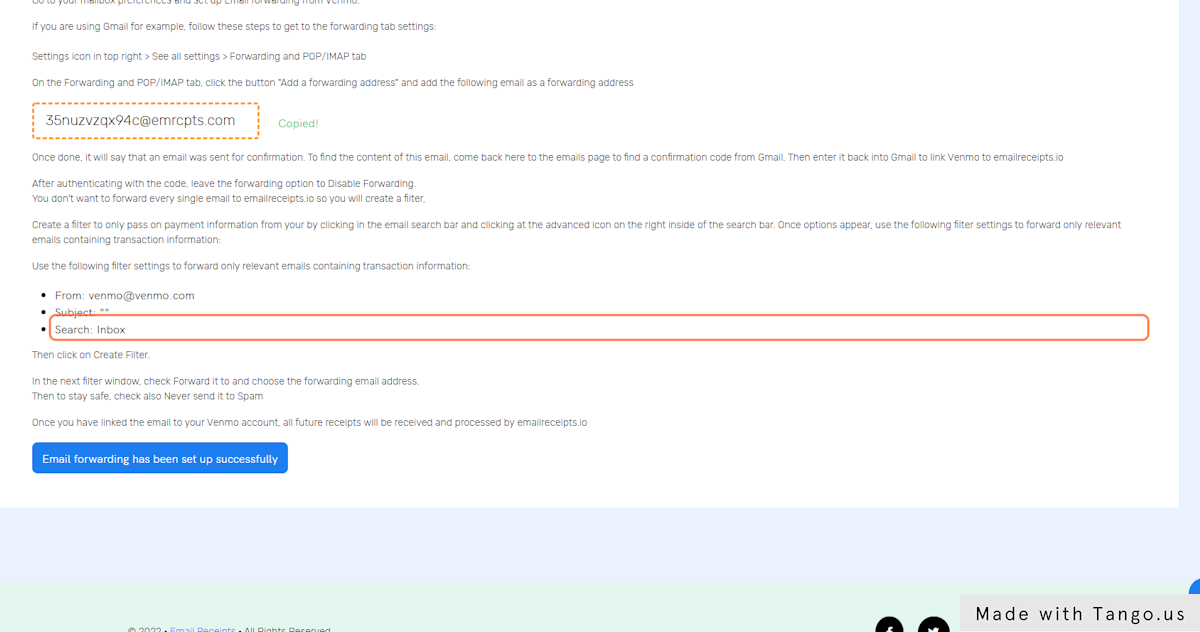
18. Go back to emailreceipts.io and click on Verify to verify that the email receipt has been processed

Go back to emailreceipts.io and click on Verify to verify that the email receipt has been processed

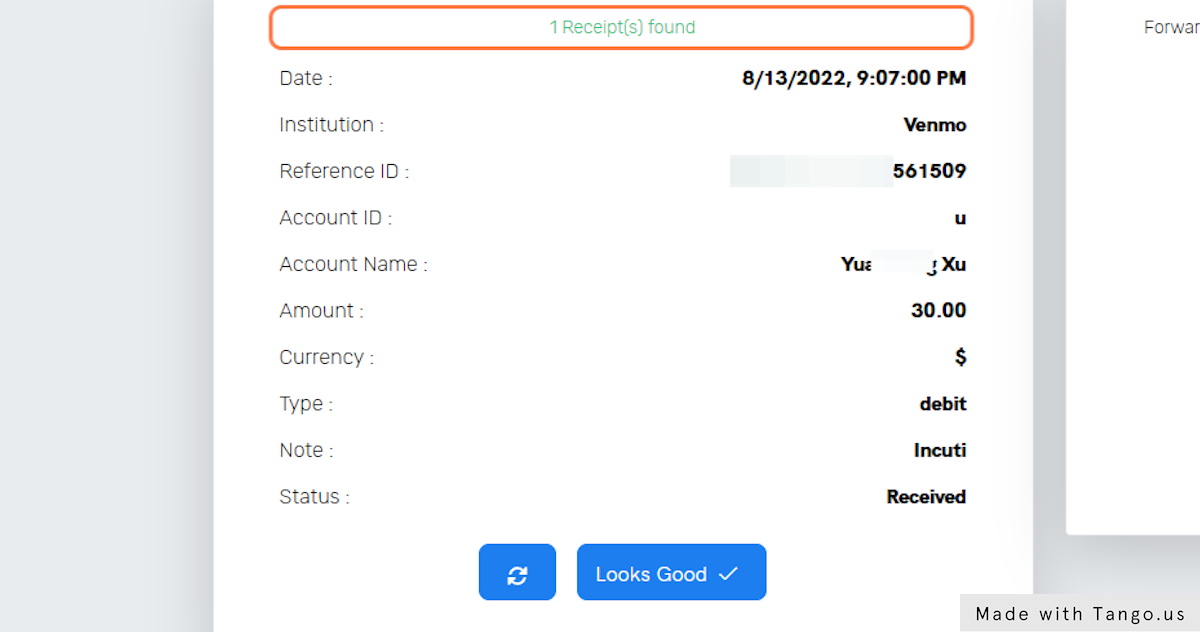
19. You should see 0 or 1 Receipt(s) found depending on whether the receipt has been processed yet or not

You should see 0 or 1 Receipt(s) found depending on whether the receipt has been processed yet or not

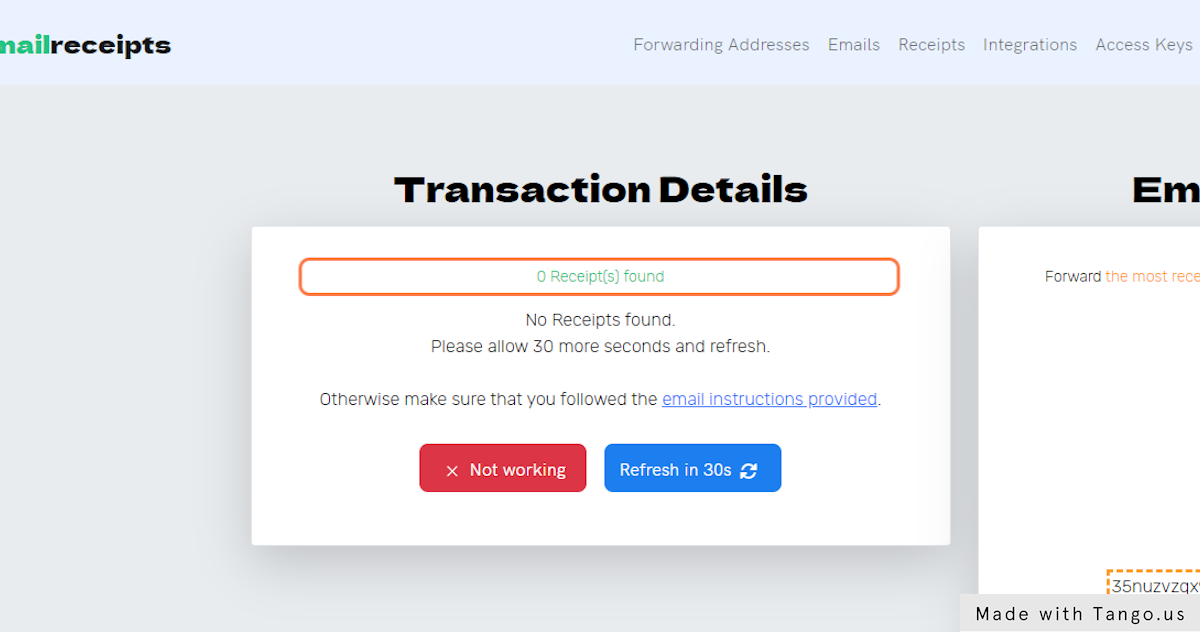
20. If the receipt has not yet been processed, click on Refresh

If the receipt has not yet been processed, click on Refresh

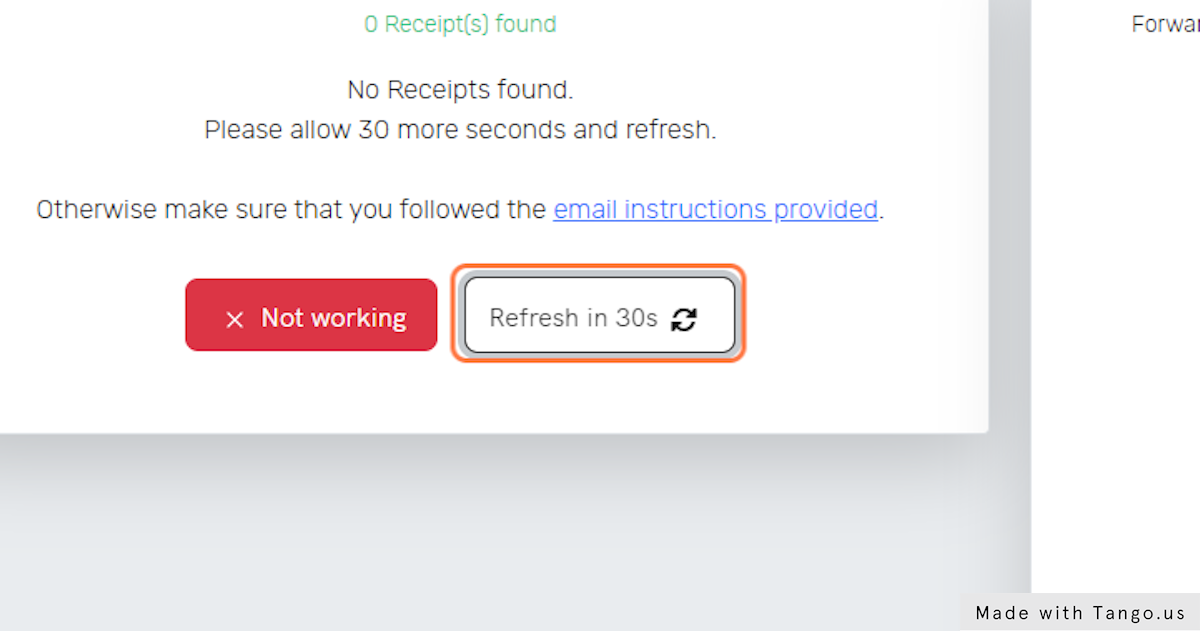
21. If it takes longer than 1min, click on Not working to check if the email was received and if it wasn't make sure that you sent it to the right email (you may also contact us if confused)

If it takes longer than 1min, click on Not working to check if the email was received and if it wasn't make sure that you sent it to the right email (you may also contact us if confused)

22. Usually email receipt processing takes 10-30s so eventually you should see that a receipt has been found

Usually email receipt processing takes 10-30s so eventually you should see that a receipt has been found

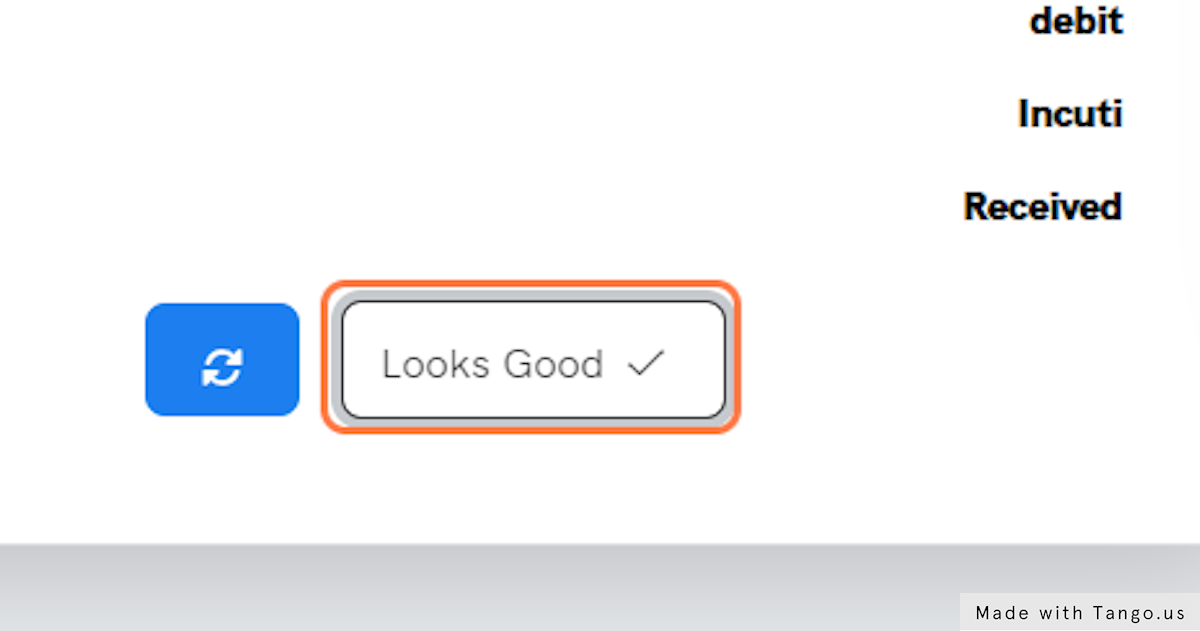
23. Click on Looks Good to move to the next step

Click on Looks Good to move to the next step

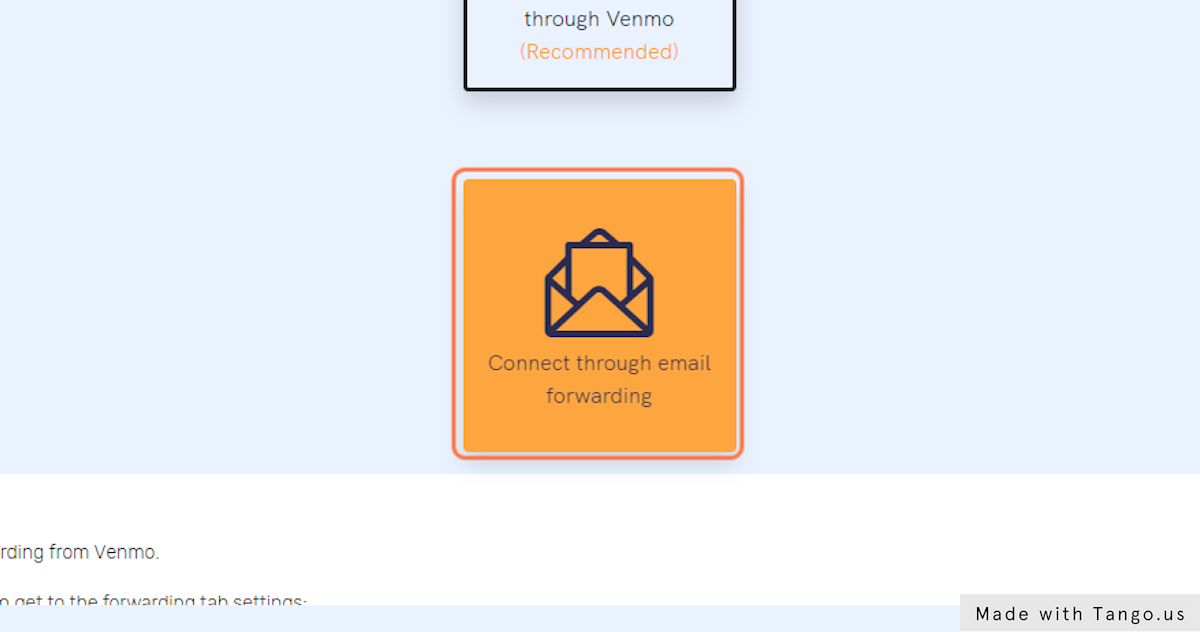
24. Click on Connect through email forwarding if you want your mailbox to forward email receipts to emailreceipts.io

Depending on your financial institution, you may choose to add the *****@emrcpts.com address as an additional notification email (meaning that the email gets notified as an additional email anytime your financial institution sends an email) or you might decide instead to do it from your mailbox where you can filter exactly what types of emails to forward to emailreceipts.io

Most financial institutions do not send sensitive information through emails, so if yours does, you might want to use the advanced filter to only forward the receipts.

Click on Connect through email forwarding if you want your mailbox to forward email receipts to emailreceipts.io

25. Copy input titled "******@emrcpts.com"

Copy input titled "******@emrcpts.com"

26. Click on Search: Inbox

Click on Search: Inbox

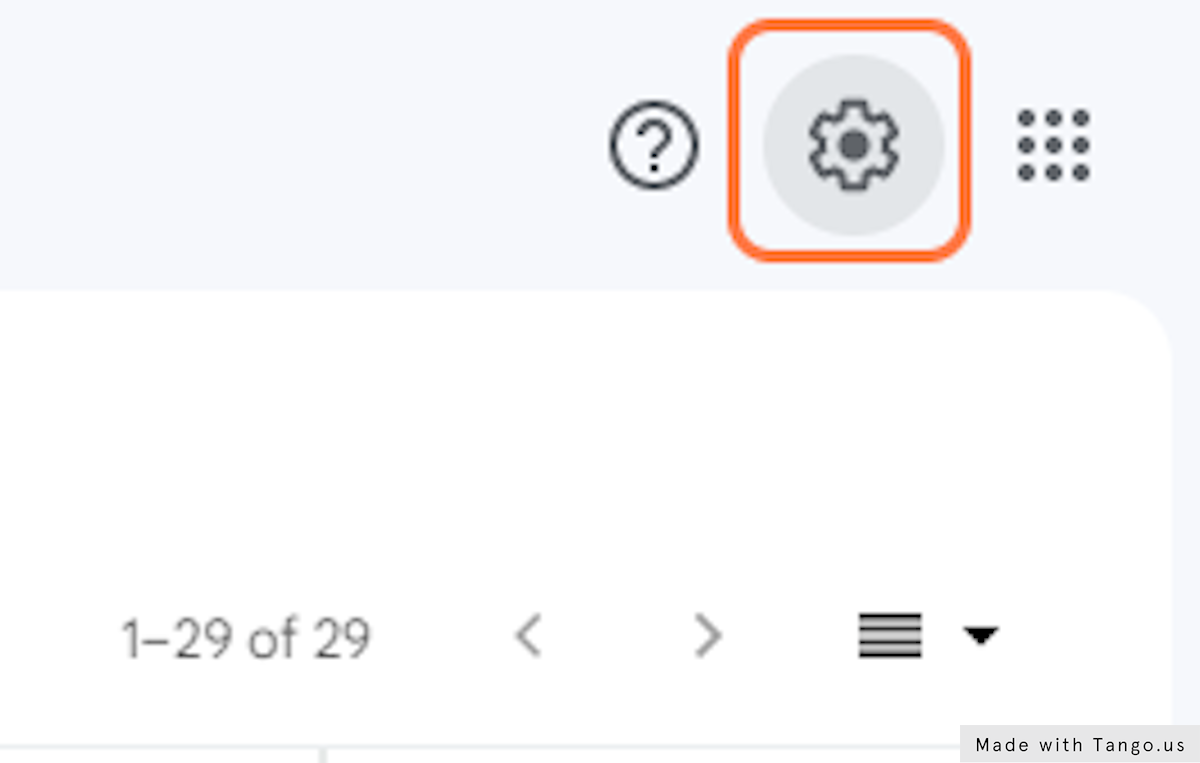
27. Click on Settings

Click on Settings

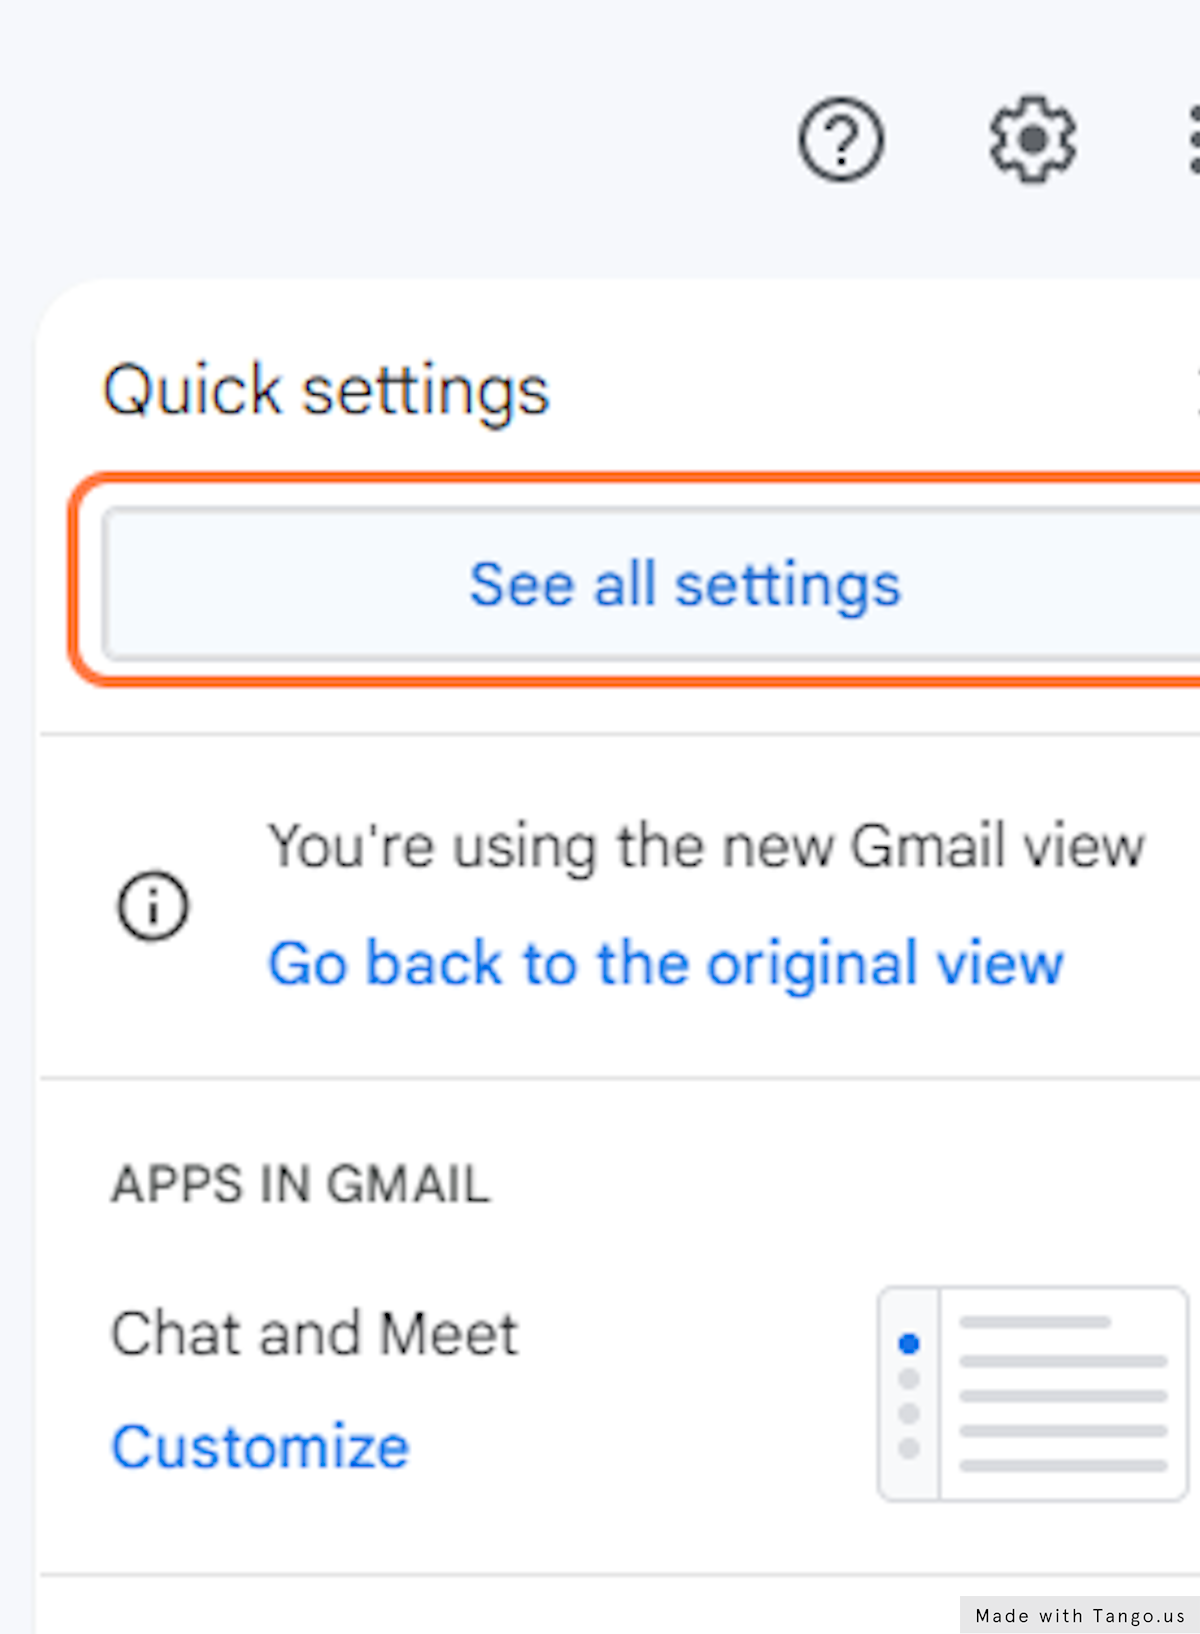
28. Click on See all settings

Click on See all settings

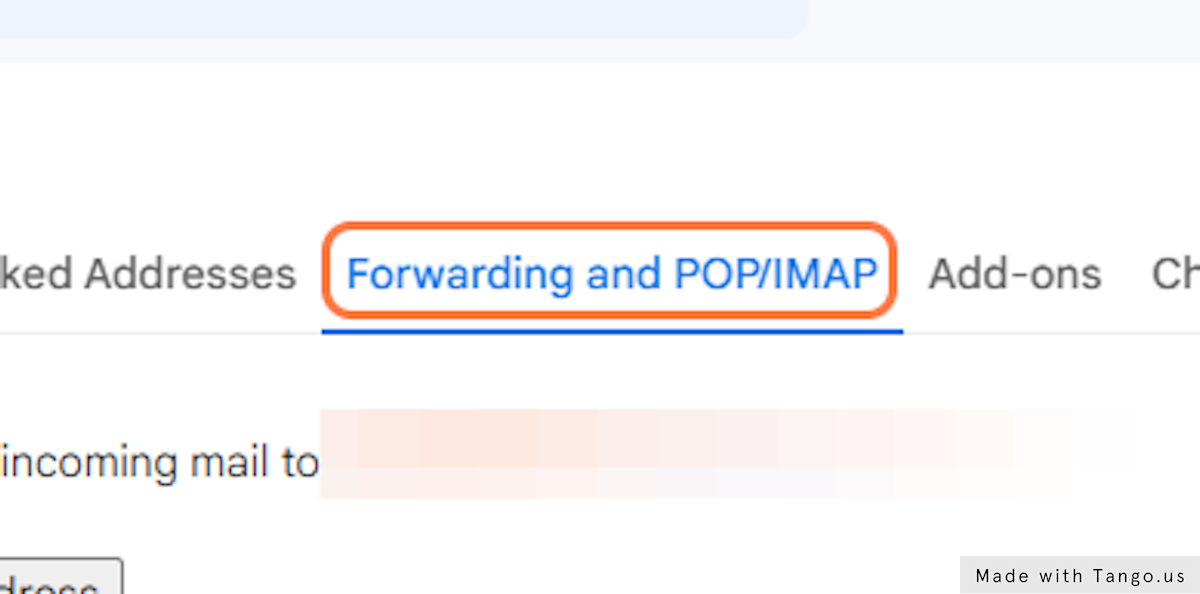
29. Click on Forwarding and POP/IMAP

Click on Forwarding and POP/IMAP

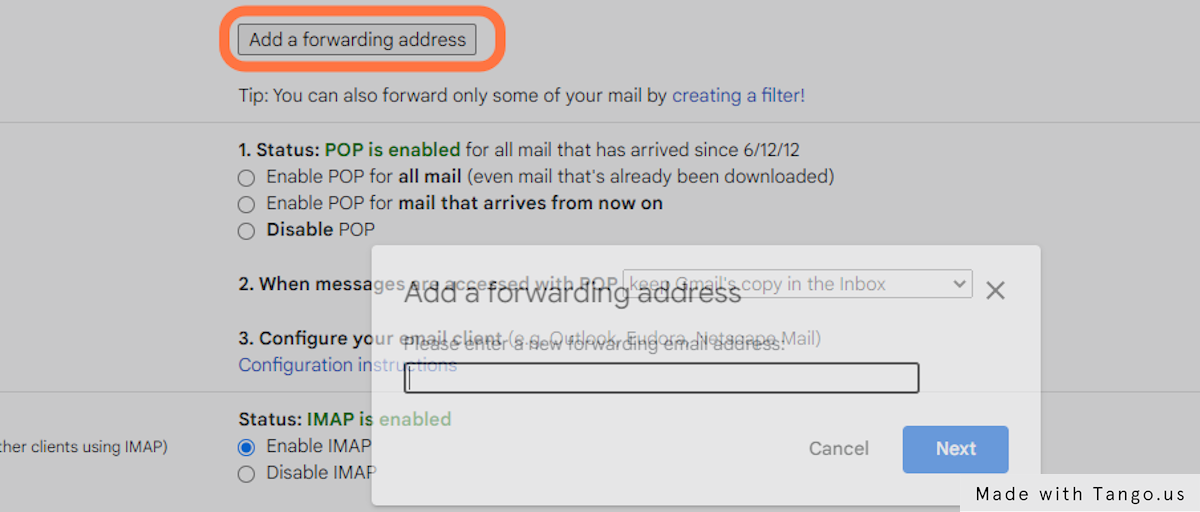
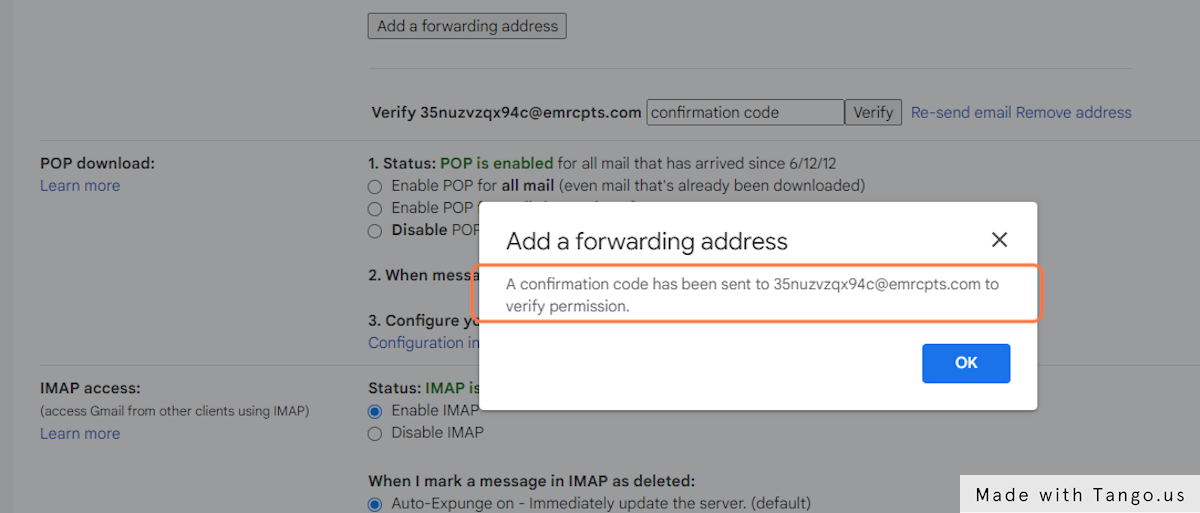
30. Click on Add a forwarding address

Click on Add a forwarding address

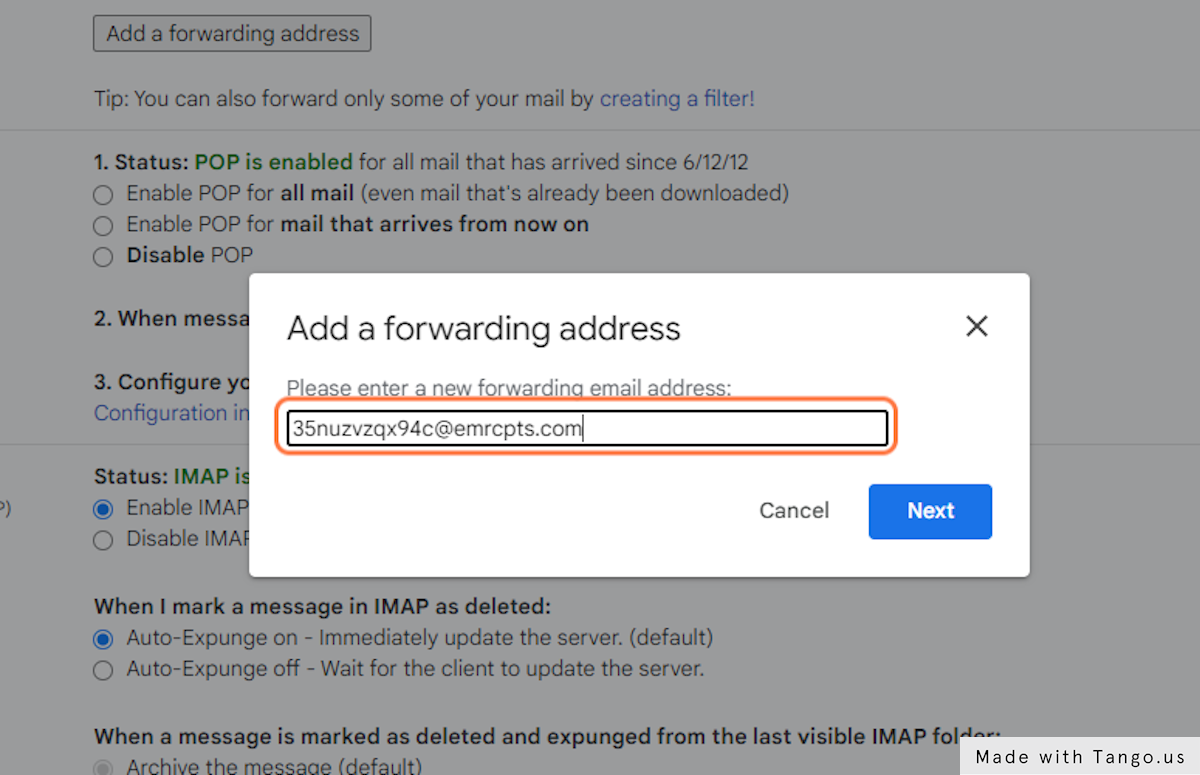
31. Paste "*****@emrcpts.com" into input then Click on Next

Paste "*****@emrcpts.com" into input then Click on Next

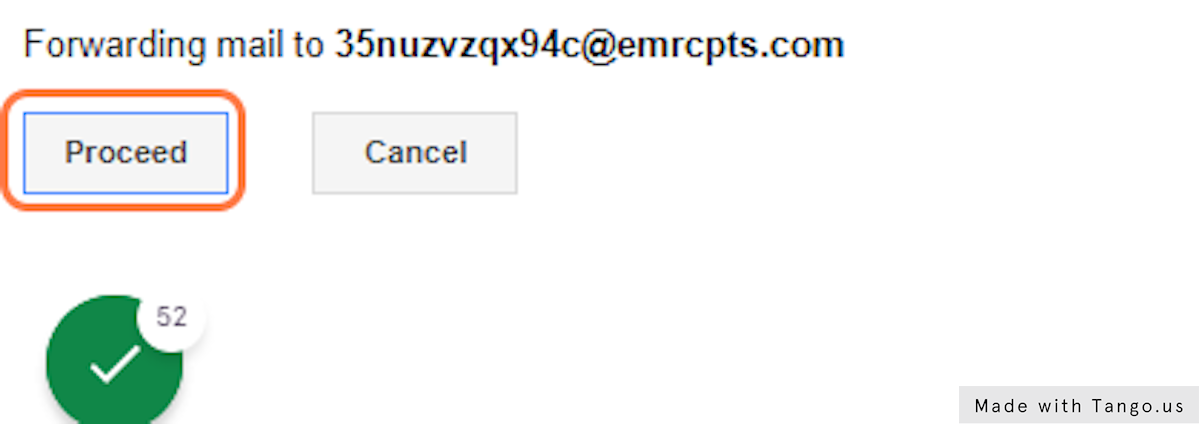
32. A popup window will open asking you to confirm: Click on Proceed

A popup window will open asking you to confirm: Click on Proceed

33. Click on OK to confirm

Click on OK to confirm

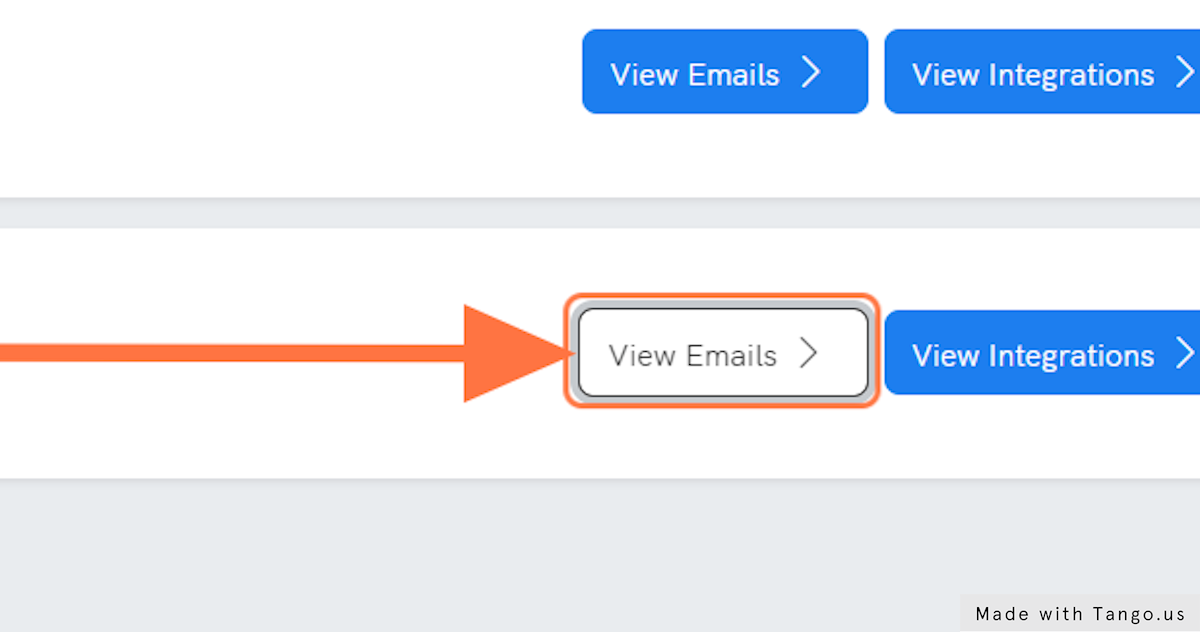
34. Click on Emails to find the email sent for verification

Click on Emails to find the email sent for verification

35. Click on View Emails of the appropriate linked financial account

Click on View Emails of the appropriate linked financial account

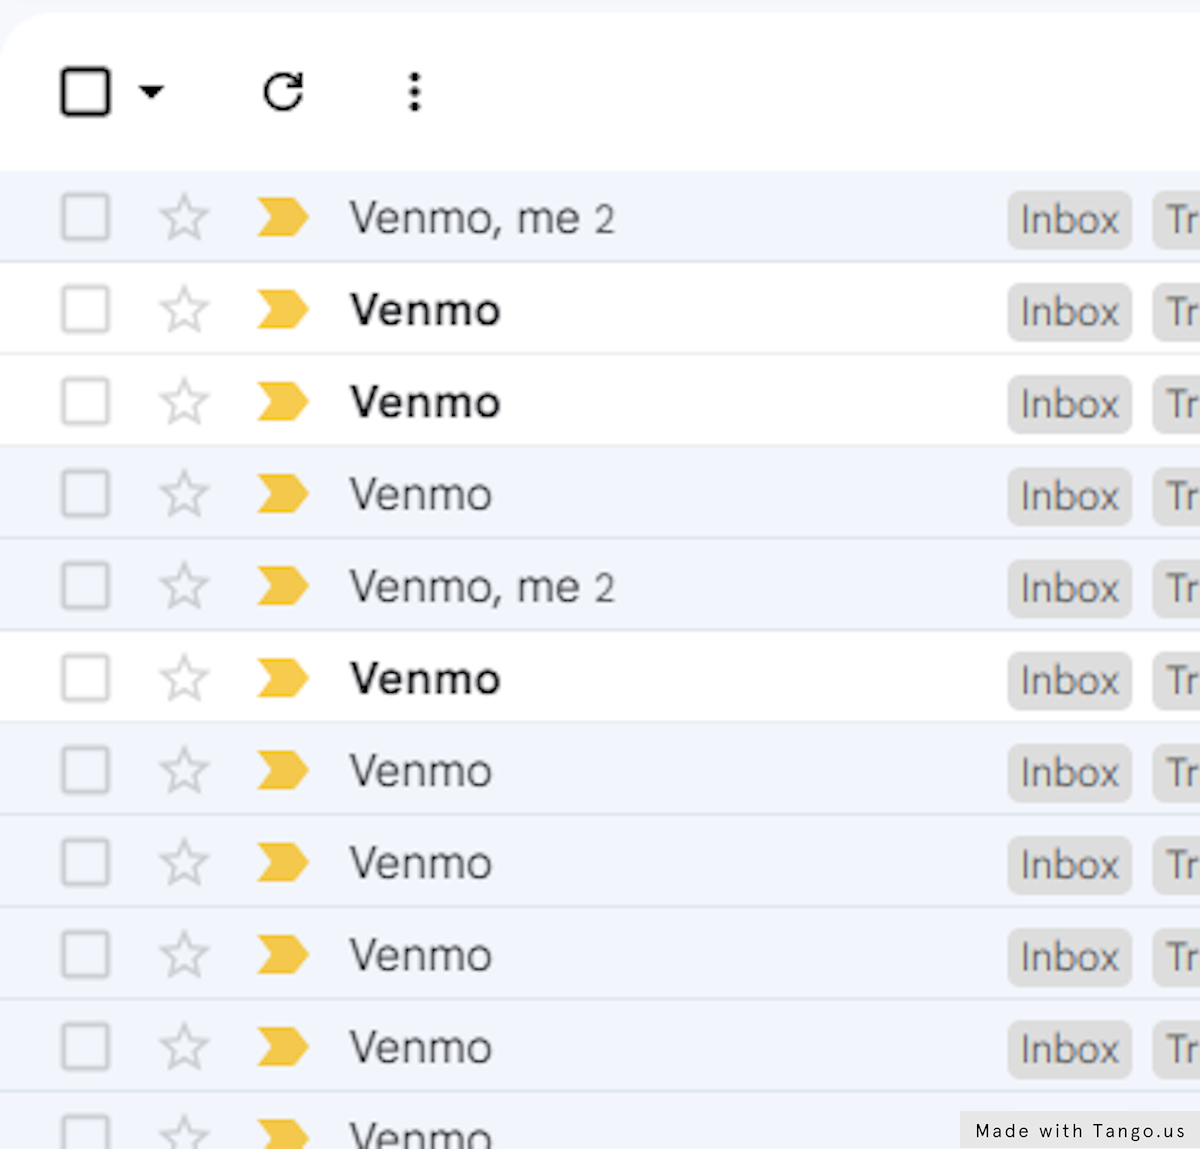
36. By now, U should have 2 emails in your dashboard: 1 email receipt and 1 email confirmation

By now, U should have 2 emails in your dashboard: 1 email receipt and 1 email confirmation

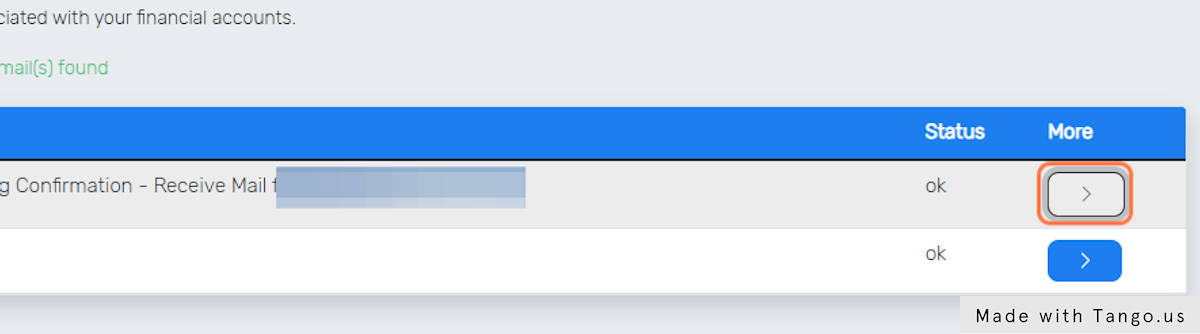
37. Copy the confirmation code from your email subject or inside the email body

Copy the confirmation code from your email subject or inside the email body

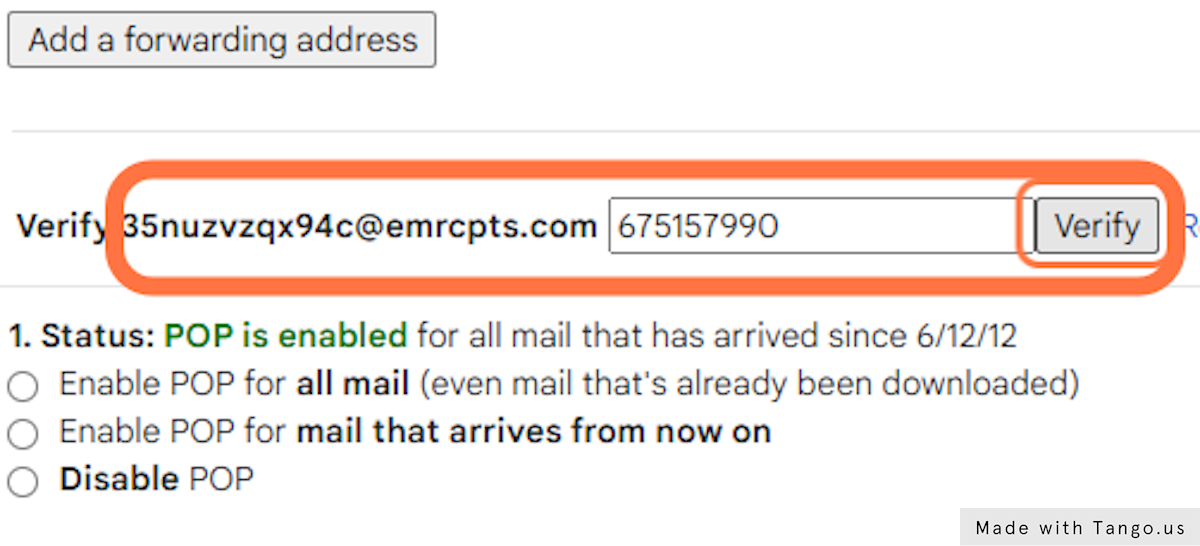
38. Go to your mailbox Settings, Paste/Type in the code then Click on verify

Go to your mailbox Settings, Paste/Type in the code then Click on verify

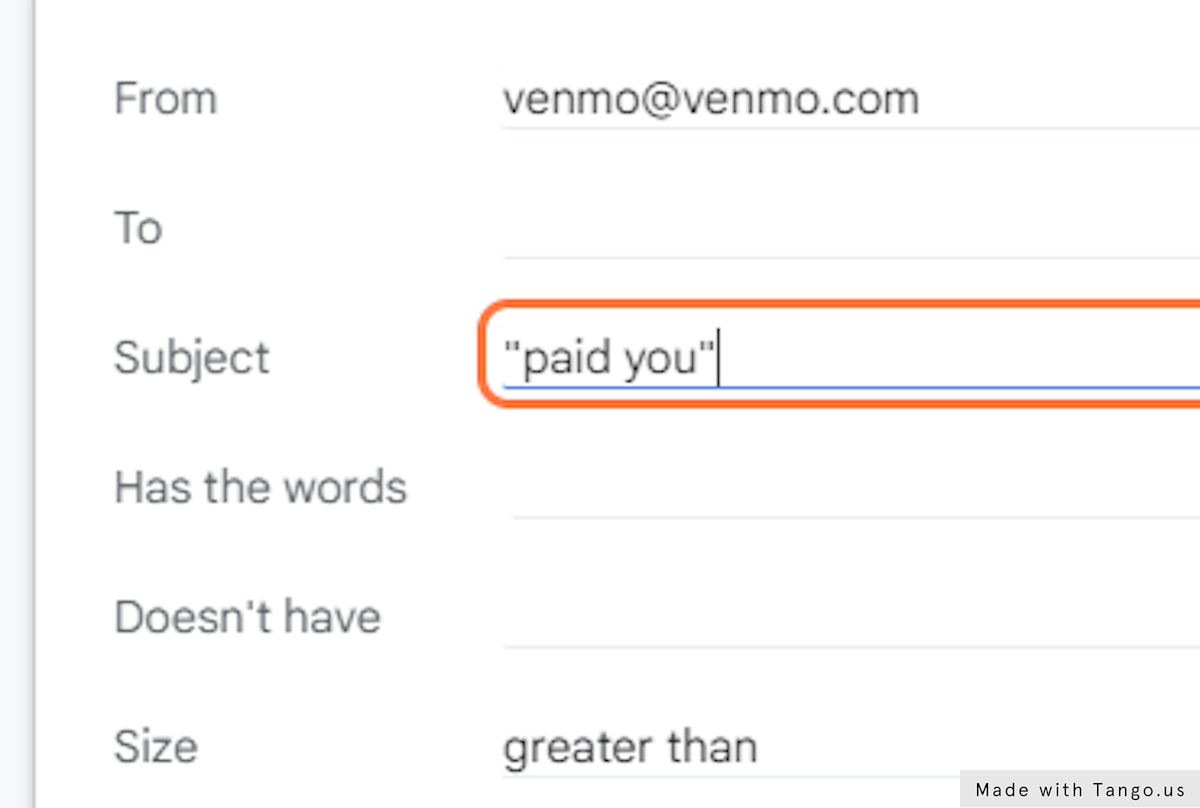
39. Click on Search / Advanced search options to setup a filter so you can only forward email receipts

Click on Search / Advanced search options to setup a filter so you can only forward email receipts

40. Type your financial institution email, the email subject used in transaction emails for your institution

If you do not know the right subject keywords your institution uses, leave it blank.

Or if for example, the subject always contains "paid" or "sent" etc.

Use the keyword and add double quotes to emphasize it.

Note: U should also click on search first to make sure the results coming in are what you need to be forwarding.

Type your financial institution email, the email subject used in transaction emails for your institution

41. Click on "Create Filter"

Note: U should also click on search first to make sure the results coming in are what you need to be forwarding.

Click on "Create Filter"

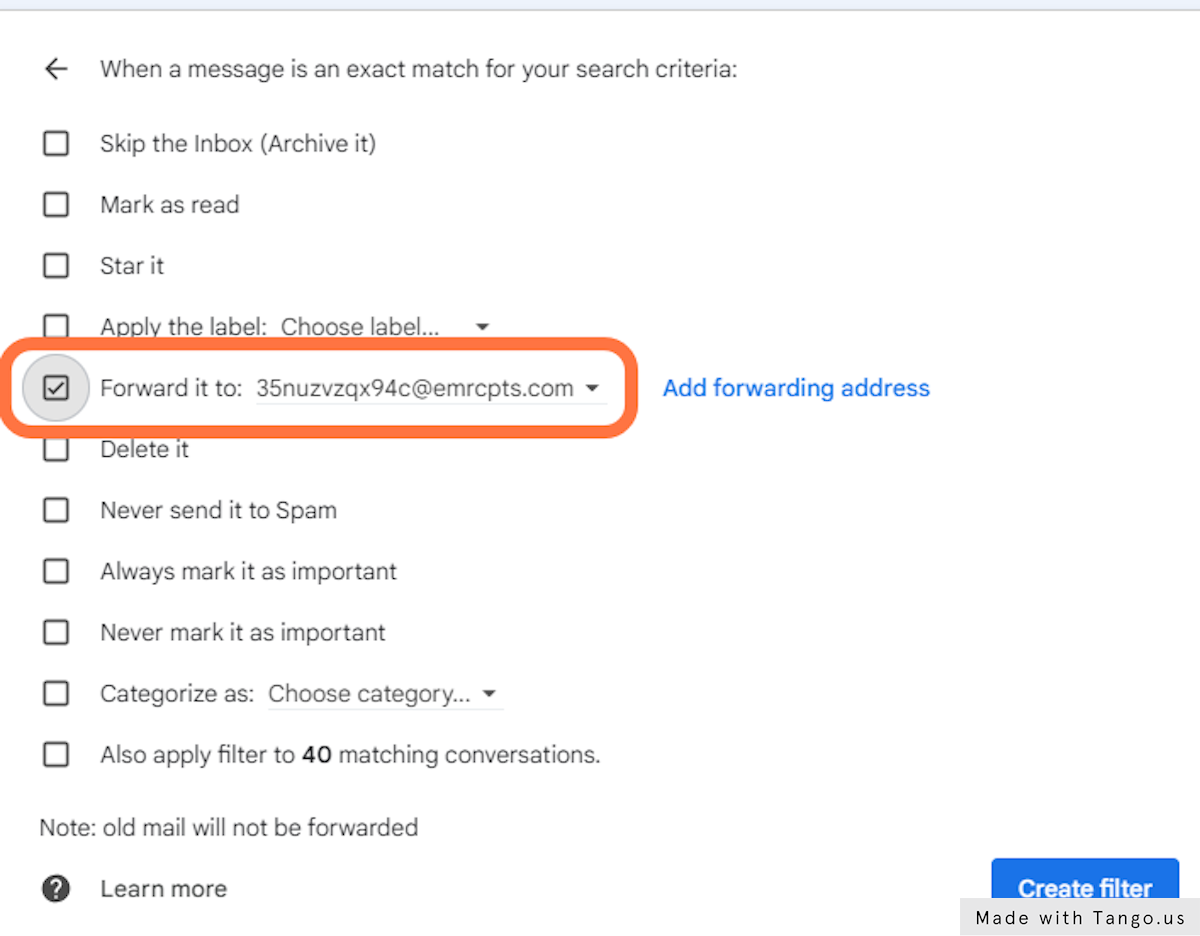
42. Choose the address to Forward all future emails that fit the criteria of the filter created then check it

Choose the address to Forward all future emails that fit the criteria of the filter created then check it

43. Once you have clicked on "Create filter", pat yourself on the back because you are done

Once you have clicked on "Create filter", pat yourself on the back because you are done

Congratulations, you did it. Pat yourself on the back.

Congratulations by Leo Dicaprio

This Workflow was created with Tango.

Coming soon.

Here is the step-by-step tutorial

Make sure that all the information imported from your store is correct. Click the Edit Information Button to update some information. To sync properly, some values will not be editable. These values will come directly from your plugin settings so make sure to change them before connecting to emailreceipts.io if they need to be updated

After choosing the financial institution you would like to connect, you will be asked to forward an email to test that the information received will be extracted as expected.

A unique email *****@emrcpts.com is generated for you. This is where you need to forward the most recent email receipt you received from your financial institution and wait for emailreceipts.io to do its magic.

Note: Receiving the email and extracting the transaction information usually takes around 30s

If you do not follow all instructions, the email sent will not be processed for safety reasons.

For example, if you received a receipt from financial@institution.com to your email my@email.com and instead you forward an email from myotheremail@example.com, then it will be not be processed.

Note: For safety, emails coming from the wrong sender are ignored.

Make sure to read the sender and receiver information before forwarding the email.

First, view all emails to see if the email was received.

If an email you forwarded was not received, make sure you forwarded it to the corresponding ****@emrcpts.com address linked to your financial institution.

Second make sure the email forwarded came from the institution linked to that email you forwarded it to.

If your site is down at the moment when we are sending the transaction details to your site, or something else happens that prevents the integration to fully transfer the data, you will see the details in the response received.

Also the free versions of plugins/extensions only receive the receipts and store them in your store. You will also receive notes of what is going on when emailreceipts.io tries to send transaction information to your site. 

You need a PRO plugin extension to fully update orders. 

Note: Make sure to always update your plugins to the latest maintained versions.